Palette Knife Techniques for Plein Air Landscapes
Practical guide to palette knife plein air painting. Learn tool selection, paint prep for cold weather, a simple build process, how to avoid muddy colour, and knife care.

Key takeaways
- • Palette knife work forces bold, decisive marks suited to brief outdoor sessions.
- • Use a painting knife for application and a mixing knife for palette work; two or three blade shapes are enough.
- • Prepare paint with body that holds impasto; keep tubes warm in cold weather and use minimal medium.
- • Build paintings dark to light: tone the surface, block in shadows, work midtones, then add lights last.
- • Avoid muddy colour by cleaning the blade between strokes and mixing tones separately on the palette.
There is something genuinely satisfying about laying a thick slab of paint across a panel with a knife and watching a hillside emerge in a single confident stroke. Palette knife plein air painting strips away the temptation to fiddle, forces you to commit to bold decisions, and produces a kind of textured, atmospheric mark that brushwork rarely matches. If you have been curious about making the switch outdoors, this guide walks you through everything you need to know to get started.
Why Palette Knife Painting Works Especially Well Outside
Working outdoors already demands a certain decisiveness. Light shifts, weather changes, and you rarely have more than an hour or two before the scene looks completely different. The palette knife suits this context well because it is, by nature, a blunt instrument. It resists overworking. Each stroke either works or it does not, and going back in risks lifting the paint below.
The bold marks that knives produce also read well in plein air studies. You are not painting for close inspection; you are capturing tone, light, and mood. A broad drag of yellow-grey across a sky says “overcast afternoon” more effectively than twenty careful brushstrokes blending into one another. The knife naturally tends toward the broad and the expressive, which is exactly what outdoor work demands.
There is also something to be said for the physical experience. Painting with a knife feels direct in a way that brush painting sometimes does not. The paint is right there on the blade, and you make a decision with every application.
Choosing the Right Knife for Landscape Work
Painting Knives vs Mixing Knives
This distinction trips up a lot of painters, so it is worth being clear. A mixing knife is a flat, straight-bladed tool used for mixing paint on the palette. It looks a bit like a small spatula. A painting knife is different: it has a cranked or bent handle that lifts your knuckles away from the painting surface, and a flexible, responsive blade that you actually use to apply paint to the panel. When people talk about palette knife painting, they almost always mean a painting knife.
Both have a role in outdoor work. Use your mixing knife on the palette to prepare your colours; use your painting knife to apply them. Trying to paint with a mixing knife is frustrating because the handle gives you no clearance and the blade lacks the right flex.
Blade Shapes to Know
You do not need a large collection of knives to paint outdoors effectively. Two or three shapes cover most plein air work, and keeping your kit light is always a priority. The main shapes to know are:
| Shape | Best for | Typical use outdoors |
|---|---|---|
| Diamond / trowel | Large areas, skies, fields | Blocking in tonal masses quickly |
| Spade / pointed | Edges, detail, tree lines | Suggesting detail without overworking |
| Elongated / straight | Horizon lines, water reflections | Flat, confident strokes |
| Small round | Impasto accents, highlights | Final light touches on focal points |
A diamond or trowel shape is a good starting point if you are new to knife work. It covers ground quickly and forces you to think in masses rather than detail. Add a pointed spade shape for any work you need to do on edges or distant tree lines. For most sessions, that pair will see you through.
Rosemary & Co, based in the UK, make painting knives worth looking at. Jackson's Art and Ken Bromley both stock a range of options at various price points, and their own-brand knives are a reasonable starting point while you work out which shapes suit your painting style.
Getting Your Paint Ready Before You Start
Paint consistency matters more with knife work than it does with brushes. You need paint that holds its shape when applied: firm enough to sit on the surface with some body, but not so stiff that it drags and tears. Buttery, soft paints can work, but very fluid or oily paints tend to slip and spread in ways that make clean knife strokes difficult.
Cold weather is the most common problem for UK painters. Oil paint that is perfectly workable at room temperature can become noticeably stiff when the temperature drops below ten degrees, which is not unusual on a morning session in October. Stiffer paint requires more pressure to spread, and that pressure can cause lifting and dragging on the surface below.
Cold weather paint tip
In cold conditions, tubes of oil paint can stiffen considerably. Keep them in an inside pocket while travelling to the site, or warm them gently in your hand before squeezing out. This makes a real difference to how the paint responds to the knife.
On mediums: use as little as possible with knife work. A very small amount of linseed oil can help if the paint is genuinely too stiff, but adding medium generally reduces the body that makes knife marks satisfying. Many painters use no medium at all outdoors when working with a knife. If you want the paint to dry a little faster, Gamblin's FastMatte range (available through Jackson's and Ken Bromley) handles well with a knife and reduces the risk of smudging when transporting wet panels home.
A Simple Process for Building a Plein Air Landscape with a Knife
This is where palette knife plein air painting starts to make real sense as a method. The process below is designed for working outdoors on a small panel (30x40cm or similar) in a single session.
Building a plein air landscape with a palette knife
Tone your surface
Wipe a thin layer of thinned paint over your panel before you start. This kills the white and gives you a mid-tone to work against from the first mark.
Establish your darkest masses
Mix your shadow tones and lay them in boldly. Don't refine edges yet. You're mapping the composition in broad terms.
Work mid-tones across the scene
Use the flat of the knife blade to drag and press paint across larger areas. Keep the palette knife moving in the direction of the form.
Add your lights last
Pile paint on for the highest lights. This is where the knife earns its keep: thick, confident strokes for sunlit surfaces, grass edges, and sky breaks.
Restrain the detail
Resist the urge to add fine marks for everything. One or two sharp knife edges in the focal area is enough. The rest should remain loose.
Toning the surface is genuinely important with knife work. A white panel creates a harsh, unforgiving ground. A mid-tone (raw umber thinned with a touch of solvent works well) gives you a starting point from which both darks and lights read clearly. Wipe it on and off quickly with a rag; you are not trying to create an underpainting, just kill the white.
Working dark to light keeps the knife marks cleanest. Lay in your shadow masses first and resist the temptation to refine them. You are establishing tonal structure, not painting finished shapes. Use the flat of the blade and drag it confidently rather than dabbing or stippling, which creates a restless, broken texture in passages that should read quietly.
The mid-tone stage is where most of the painting happens. Use the flat of the blade to spread paint across larger areas, varying pressure to control how much paint you deposit. Dragging the blade across the surface leaves a textured, broken mark; pressing firmly and lifting cleanly deposits a smoother patch. Both have their place.
Adding the lights last is one of the genuine pleasures of knife painting. Pile paint onto sunlit surfaces, the top edges of waves, lit field edges, and sky breaks. The thickness of the paint reads as light in a way that is very hard to achieve with a brush. Keep these strokes confident and minimal.
Knowing when to stop is as important as any of the above. One sharp edge in the focal area is enough. Resist adding more.
Handling Texture and Avoiding Muddy Paint
Muddy, grey results are the most common complaint from painters new to knife work, and they almost always come down to one of two causes: mixing on the canvas surface rather than the palette, or failing to clean the knife between strokes.
When you drag a knife loaded with one colour across a passage of wet paint in a different colour, some of that lower colour will pick up onto the blade. If you then apply that contaminated paint elsewhere, the colours begin to grey. The solution is simple but requires discipline: wipe the blade clean on a rag after every stroke. Keep a rag in your non-dominant hand while you paint; it becomes automatic quickly.
Keeping your colour passages separate on the palette also helps. Mix each tone cleanly before applying it, rather than loading the knife from a muddy palette area. Outdoors, where palette space is often limited, this requires a bit of organisation at the start of the session.

Palette knife painting outdoors: honest trade-offs
Pros
- + Forces bold, decisive marks that suit the plein air context
- + Produces expressive texture that reads well at a distance
- + Faster to block in large areas than fine brushwork
- + Difficult to overwork a passage once it is down
Cons
- - Less control for fine detail or complex foliage
- - Cold or windy conditions affect how paint sits on the surface
- - Requires cleaning between strokes to avoid mud
- - Takes practice to judge how thick to apply
Adapting Your Approach for UK Conditions
British outdoor painting conditions are specific enough to deserve their own section. The combination of cold temperatures, changeable weather, and frequent overcast days shapes how palette knife oil painting actually works in practice here.
UK outdoor painting conditions: what to expect
- Average summer temperature (UK)
- 17-21°C
- Average winter temperature (UK)
- 3-8°C
- Average UK annual overcast days
- ~150 per year
- Wind speed guideline
- Above ~15 mph
Paint stays workable but can skin quickly in direct sun
Oil paint stiffens noticeably; keep tubes warm
Consistent flat light is ideal for value-focused knife work
Loose paper palettes become impractical; wet paint can be disturbed
Cold temperatures are the main practical challenge. Below around seven or eight degrees, oil paint loses the workable, plastic quality that makes knife strokes satisfying. Warming tubes before use helps significantly. Once the paint is on the palette and on the panel, cold slows drying, which sounds like a benefit but can mean that freshly applied impasto marks remain vulnerable for longer.
Wind is a genuine nuisance above about fifteen miles per hour. Thick, freshly applied knife marks can be physically disturbed if your panel is exposed to gusts. Position your easel or pochade box so the panel faces away from the prevailing wind where possible, and keep sessions shorter when conditions are blustery. Loose paper palettes are impractical in wind; a sealed tear-off palette or a traditional wooden palette with some weight to it is a better choice.
Overcast light is actually excellent for knife work, and this is worth recognising. On a flat, grey British day, tonal values are consistent, shadows are soft, and you are not chasing shifting light. You can spend your time on the painting rather than the logistics of light change. Many experienced plein air painters consider a still, overcast day ideal for working in this technique.
What to Paint: Subjects That Suit the Palette Knife
Not every subject rewards knife work equally. Open, uncomplicated landscapes suit it well; dense, intricate subjects tend not to.

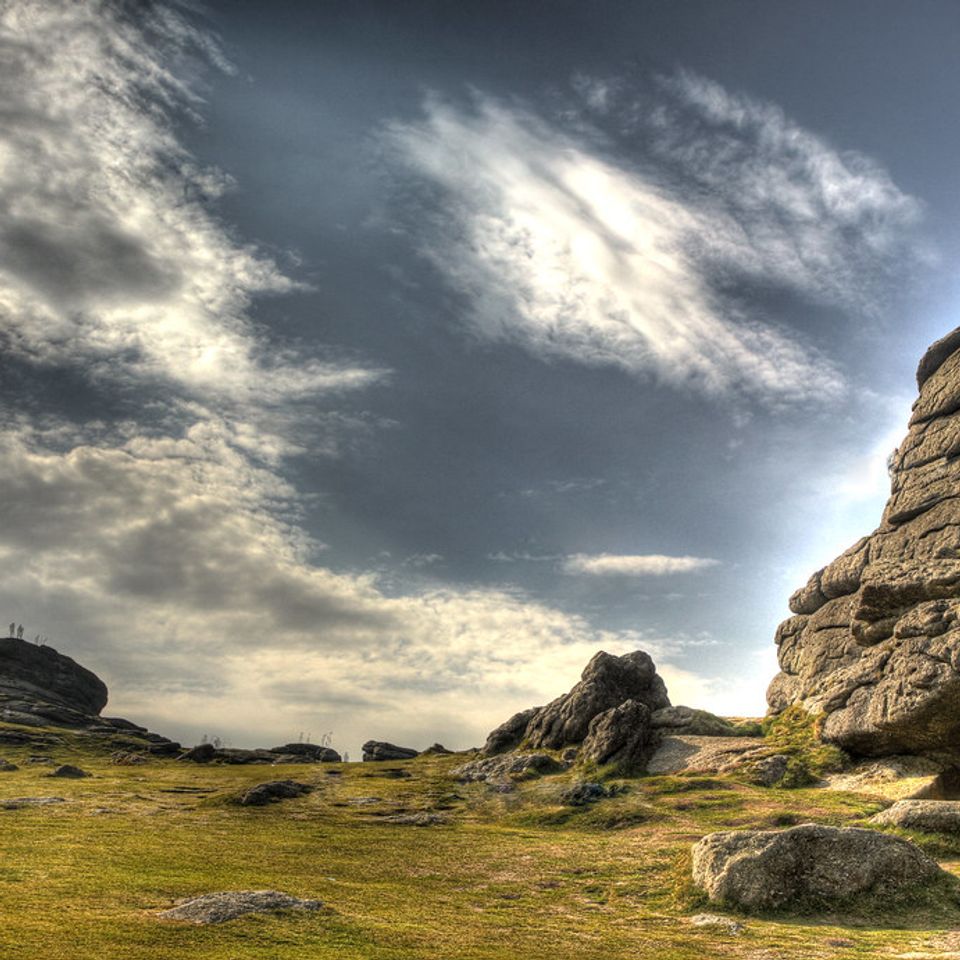
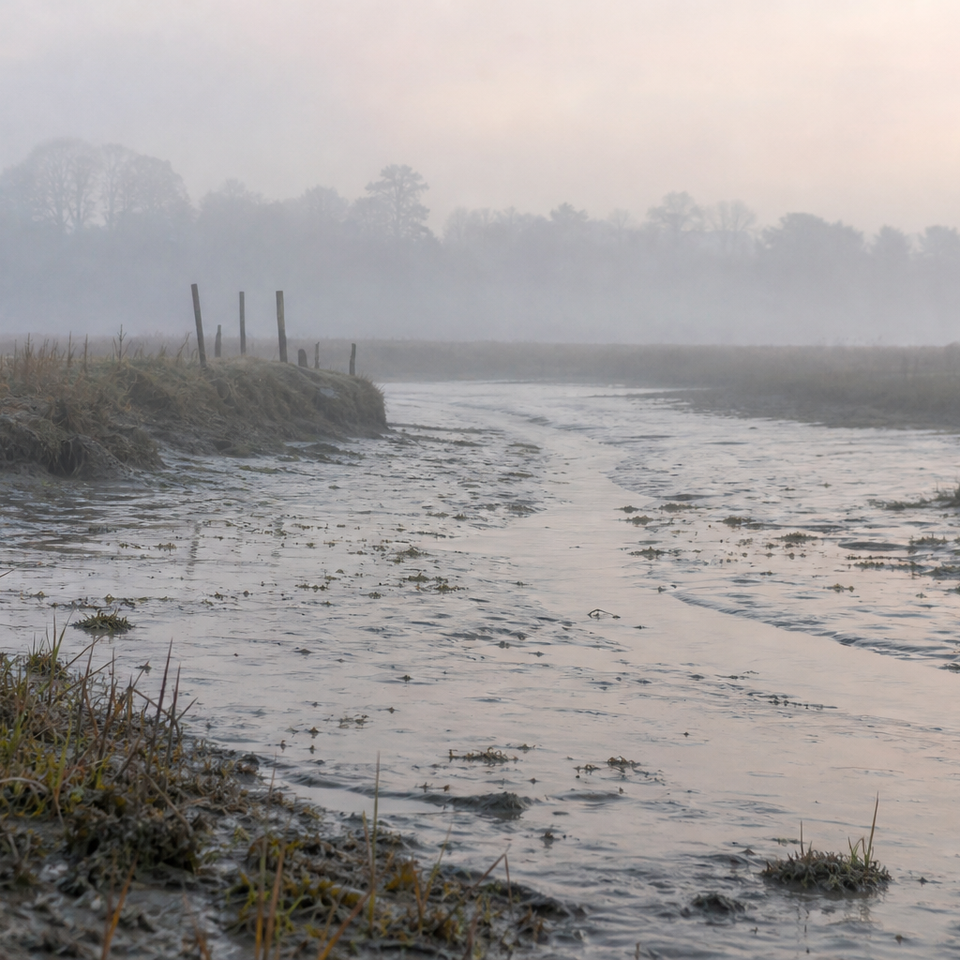
For UK painters, the subjects that work best with a knife include coastal cliff scenes (Northumberland, Pembrokeshire, the Jurassic Coast), open moorland (Dartmoor, the North Yorkshire Moors, Exmoor), the broad flat landscapes of the Fens, field edges and hedgerow lines, and wide skies over low-lying ground. These are all subjects where simplification is an advantage rather than a compromise. The knife forces you to read the scene in masses, which is exactly how these landscapes ask to be read.
Broad skies respond particularly well. A single confident drag of a large diamond blade can establish a cloud bank in a way that a brush simply cannot match. Water reflections, laid in with an elongated straight blade and minimal pressure, have a natural flatness that suits the technique.
Subjects to approach carefully include dense woodland (where the complexity of foliage resists simplification), detailed architecture, and any scene where fine line work is structurally important to the composition. The knife can be used as an accent in these contexts, but as the primary tool it is likely to frustrate. If you find yourself in front of a subject that genuinely needs fine detail, it is worth having a small flat brush to hand for the passages where the knife is not enough.
Caring for Your Knives After a Session
Palette knives are durable tools and will last for years with minimal care. The main priority is keeping the blade clean and dry. Oil paint that is left to dry on a blade is difficult to remove and can affect how the knife responds on the surface. Wipe the blade thoroughly after every session with a rag or kitchen paper before the paint has a chance to harden.
Most painting knives have stainless steel blades, which are reasonably resistant to rust, but still benefit from being dried before storage. If you have been working in damp conditions, give the blade a wipe with a dry cloth before putting the knife away.
Store knives flat rather than standing blade-down in a jar, which can bend the tip over time. A simple roll or case that keeps the blades separate and protected is ideal. A good painting knife, properly looked after, is not something you need to replace; it will be with you for the long term.
FAQ
Frequently Asked Questions
What is the difference between a painting knife and a mixing knife?
A mixing knife is a flat spatula for mixing on the palette. A painting knife has a cranked handle and a flexible blade for applying paint to the surface. Use the mixing knife to prepare colour and the painting knife to lay paint on the panel.
Which blade shapes do I need for plein air landscapes?
Two to three shapes cover most outdoor work. Start with a diamond or trowel for blocking in skies and fields, add a pointed spade for edges and tree lines, and an elongated straight blade for horizons and water reflections.
How should I prepare paint for cold UK conditions?
Keep tubes warm in an inside pocket or warm them in your hand before squeezing out. Use minimal medium; a touch of linseed oil only if paint is too stiff. Consider a fast drying or lower sheen range to reduce smudging during transport.
How do I avoid muddy colours when using a knife?
Mix each tone cleanly on the palette and keep colour passages separate. Wipe the blade on a rag after every stroke to prevent picking up wet paint from lower passages. Organise palette space before you start.
What subjects suit palette knife plein air painting best?
Open, simplified landscapes work best: broad skies, moorland, coastal cliffs, field edges, and water reflections. Dense woodland or detailed architecture are harder to render with the knife as the primary tool.
Author

PleinAirPainting Editorial Team
PleinAirPainting.co.uk helps artists paint outdoors with confidence through UK-focused guides, equipment advice, resources and plein air inspiration.