Plein Air Painting in Fog: How to Read and Paint UK Mist and Atmosphere
A practical guide to plein air painting in fog. Learn to mix a fog grey, work within a compressed tonal range, use soft edges, pick simple subjects, pack compact kit and stay safe.

Key takeaways
- • Fog reduces detail and teaches you to focus on shape, mood and atmospheric depth.
- • Mix a single fog grey first and add it into all middle and distant mixes to unify the scene.
- • Work in a compressed tonal range and reserve your darkest note for a near-foreground accent.
- • Use mostly soft, lost edges and allow one or two firmer edges for a focal point.
- • Pack a compact, protected kit and plan for safety, tides and changing visibility.
Plein air painting in fog is one of those subjects that looks uninviting until you actually try it. You arrive at a misty estuary or a moorland track and half the scene has simply vanished. But that is precisely what makes it worth painting. Fog strips away the complexity that usually trips painters up outdoors and replaces it with something far more tractable: shape, mood, and depth. Once you understand what fog is doing to the scene in front of you, it becomes one of the most rewarding conditions you can work in.
Why Fog is Worth Painting (Not Just Putting Up With)
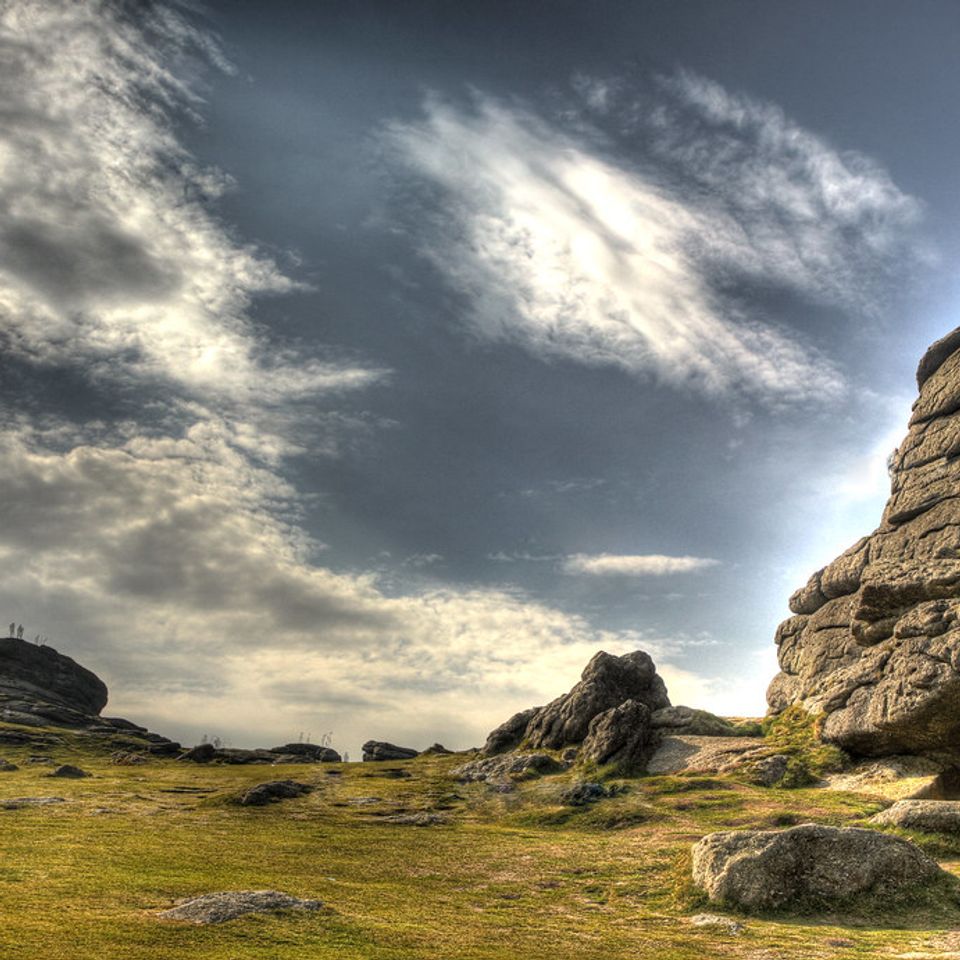
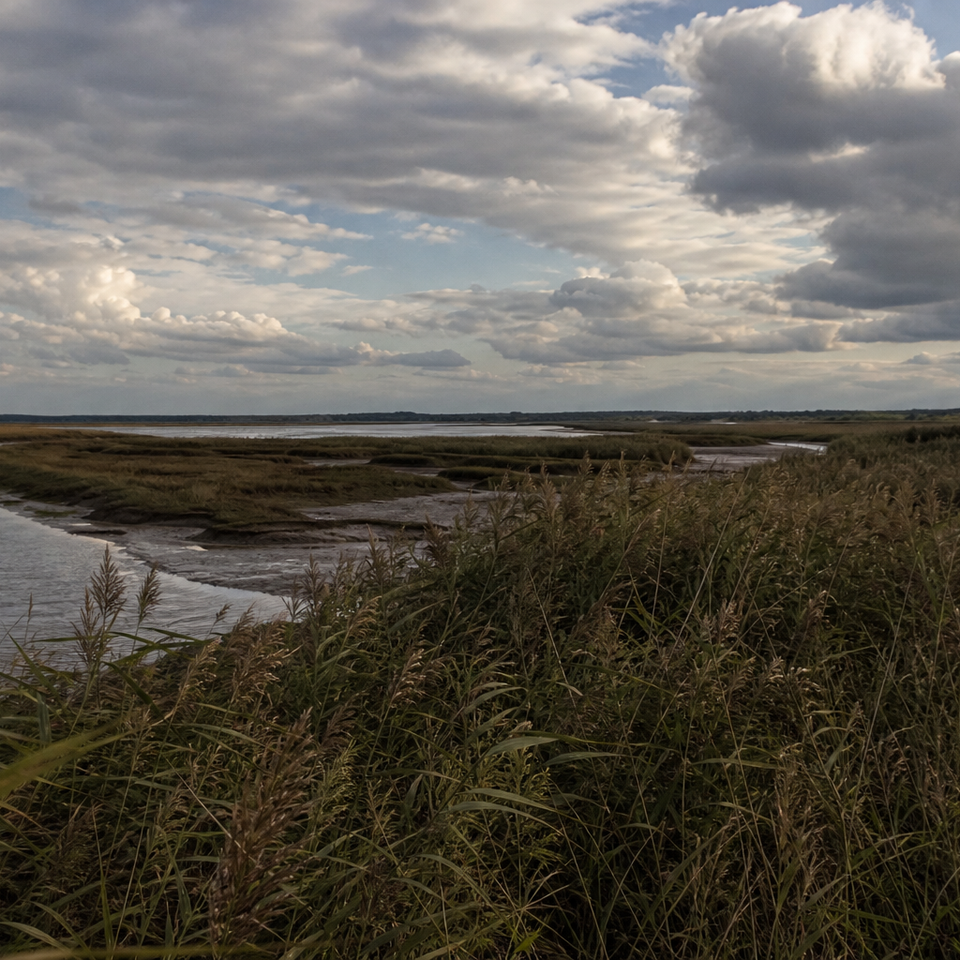
Fog is not an exotic subject in the UK. Coastal haar rolls in off the North Sea with no warning. Estuaries hold mist until mid-morning. Dartmoor and the Pennines disappear under low cloud for days at a time. This is a normal British condition, and it has drawn painters to the landscape for centuries. Monet's Houses of Parliament series is the famous example: he painted the same subject dozens of times under different atmospheric conditions, and the fog studies are among the most valued precisely because they reduce the scene to its essential qualities.
That is the practical lesson for painters. Fog forces you off the detail and onto what actually matters in a painting: value relationships, atmospheric depth, and the overall mood of a place. It is an unusually good teacher, and the results tend to have a quiet authority that clear-day paintings sometimes lack.
Understanding Atmospheric Perspective in Fog
Atmospheric perspective describes the way objects lose contrast, definition, and warmth as they recede into the distance, due to the air itself becoming a visual medium. In clear conditions this effect is gradual. In fog, it is compressed into a short distance and becomes the dominant fact of the scene.

What fog does to your scene
- Distance
- Objects get softer, cooler, paler
- Tonal range
- Compressed — avoid full darks and whites
- Edges
- Mostly lost or soft
- Colour saturation
- Reduced — grey or muted neutrals dominate
- Painting size
- Go smaller — 15×20 cm to A4
The core rule of atmospheric perspective
Save your darkest dark for the nearest foreground accent
Reserve sharp edges for one or two focal points only
Mix a "fog grey" and add it to all distant colours
Fog shifts fast; smaller formats help you finish in time

Distance makes things softer, cooler and paler
The further an object sits from you in fog, the more it loses definition, drops in tonal contrast, and shifts toward cool, neutral tones. A tree line 200 metres away may be barely distinguishable from the fog itself. This is atmospheric perspective working at its most extreme, and your job as a painter is to honour it rather than fight it. Resist the instinct to paint distant objects with the same firmness you can see in foreground shapes.
Fog colour must be in your mixes, not added at the end
A common mistake is to paint the scene as though it were a clear day and then try to add a fog effect afterwards, perhaps by glazing a pale wash or scumbling white over the top. This rarely works. The fog needs to be built into every mix for every object in the middle and far distance. Before you start painting, mix a "fog grey": a cool, mid-value neutral that captures the colour of the atmosphere itself. This becomes your reference point for everything behind the foreground.
The tonal range compresses — use less of it
In clear conditions, your tonal range might run from near-black to near-white. In heavy fog, the effective range is a fraction of that. The darkest you will see in the middle distance might be a soft mid-tone. The lights may never approach white. Working within this compressed range is uncomfortable at first, but it is what gives fog paintings their coherent, atmospheric quality. Reserve your single darkest note for the nearest foreground and do not exceed it anywhere else in the painting.
Core Techniques for Plein Air Fog Painting
Choosing the right subject and viewpoint
Simple subjects work better than complex ones in fog, and for good reason: fog simplifies, but it does not organise. If your scene already has too many competing elements, fog will reduce it to confusion rather than atmosphere. Look for a strong foreground anchor (a harbour wall, a gate, a stand of trees, a boat) that you can see clearly, with the middle and far distance dissolving behind it. This structure gives the eye somewhere to enter and something to rest on.
Avoid viewpoints where fog has eliminated all useful spatial layers. You need at least one readable foreground element. If the scene is entirely uniform grey in every direction, move to a position where a tree or a building provides that near-ground contrast.
Building a fog painting: the working sequence
Fog changes faster than most conditions, so having a clear working sequence before you pick up a brush matters more than usual.
Working sequence for a fog painting
Do a quick value sketch
Before setting up fully, spend 2–3 minutes sketching the major shapes and value masses. Fog changes fast — this locks in your intention.
Establish the fog mass early
Mix your "fog grey" (a cool, mid-value neutral — try a blue-grey with a touch of local colour, e.g. green for moorland, violet for urban dusk) and block in the middle and far distance with this as your base.
Block in the largest shapes
Work from big to small. Silhouettes of trees, buildings, or hedgerows — keep edges soft in the distance, allow a little more definition as shapes come forward.
Relate every colour back to the fog
For each distance layer, ask: is this warmer or cooler than the fog? Darker or lighter? Make subtle adjustments rather than guessing.
Add selective foreground accents last
A slightly darker value, a touch of warm colour, a firmer edge on the focal point. Keep it restrained — one or two notes, not a fully realised foreground.
Edges: mostly soft, a few sharp
Edge control is probably the most important single skill in fog painting. The default is soft. Most objects in a foggy scene have edges that dissolve rather than cut, and even near-ground shapes are softer than they would be on a clear day. In oils, you can achieve this by blending wet-in-wet or by gently dragging a soft brush across a painted edge. In watercolour, working into a damp surface creates lost edges naturally.
The exception is your focal point, usually the strongest foreground element. One or two edges that are slightly firmer than the rest will read clearly without breaking the atmospheric unity of the painting. More than that and the fog starts to feel pasted on rather than present.
Colour and palette notes
Fog colour varies considerably. Coastal haar in Scotland tends to be cool and blue-grey. Estuary mist in autumn often carries a warmer, ochre-tinged quality from the light filtering through. Urban winter fog can have a violet or brown cast. Observe carefully before committing to your fog grey: the colour of the atmosphere itself is specific to the location and the time of day.
A useful principle: the fog is not just grey. It picks up the colour of the prevailing light, which means your fog grey might need a touch of warmth in the morning, a cooler blue at midday, or a pinkish-lilac in the hour before dusk. Mix it from observation, not habit.
Mix your fog grey first
Before you start blocking in, mix a "fog grey" from your palette — a cool, mid-value neutral. Add a small amount of this into every mix for any object in the middle or far distance. This is the single most effective way to make a fog painting feel unified and convincing.
Medium-specific notes: oils, watercolour, and gouache
Each medium has genuine advantages in fog, and a few specific challenges worth knowing before you head out.
Oils vs watercolour in fog
Pros
- + Oils: slow drying suits prolonged wet-in-wet blending; wipe back distant shapes easily with a soft brush or rag
- + Watercolour: damp air keeps washes wet longer, making soft wet-in-wet gradations natural and easy
- + Gouache: opaque and quick-drying; ideal for small fog sketches where you want to work solidly over previous layers
Cons
- - Oils: slow drying also means panels stay wet longer — a sealed wet panel carrier is essential for transport home
- - Watercolour: very heavy damp air can prevent washes from drying at all; budget extra time or work smaller
- - Gouache: less familiar to many painters; limited tonal depth if overworked
For watercolour, use 300 gsm paper or heavier and tape it firmly before you go out. The damp air will buckle lighter paper quickly. Work smaller than you might normally: A5 is a practical size in very wet conditions. Wet-in-wet gradations that you would normally have to work quickly come almost naturally in high humidity, so take advantage.
For oils, consider the ventilation question. Painting outdoors usually means good airflow, but foggy conditions can be still and enclosed, particularly in hollows or woodland. Using a solvent-free medium keeps the working environment more comfortable and is kinder to the surrounding area.
Gear for Foggy Days: Keeping It Simple and Dry
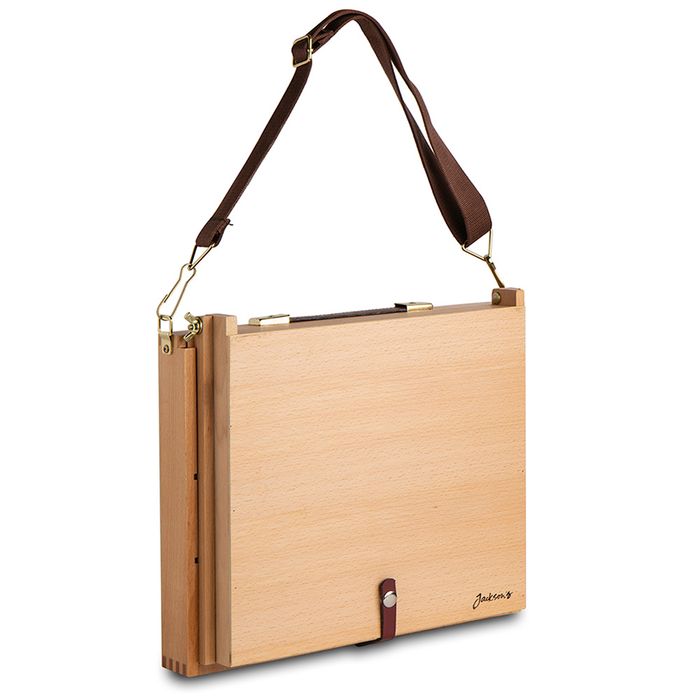
The core principle for foggy-day kit is compact and protected. Large tripod easels in fog risk being knocked by low-visibility walkers and are harder to manage when conditions shift quickly. A pochade box mounted on a compact tripod is more practical: it keeps your paints and panel together, protects your palette from condensation, and packs away fast if the weather turns.

Jackson's
Jackson's : Pochade Painting Box
This Pochade Painting Box Is Perfect For Setting Up A Workplace In The Home Or Painting Plein Air. Its Lid Folds Out To Provide An Easel With Handy Slots For Storing Two Wet Boards After Working. This Easel Can Be Secured At Your Desired Angle Using The Built-in Screws And Butter
Pre-tone your panels or boards with a mid-value neutral before you go out. This is always good practice, but it is particularly useful in fog because the compressed value range means you are working in a narrow tonal band from the start. Beginning on a mid-toned surface means your first marks are already in the right territory.
For oil painters working outdoors in still, damp conditions, a solvent-free medium is a practical and responsible choice. These alkyds work without the need for mineral spirits or other solvents, making them more comfortable to use when airflow is low and more considerate of the environment, particularly near water or in protected landscapes.
Solvent-free oil mediums for outdoor use
Gamblin : Solvent Free Gel : Oil / Alkyd Painting Medium : 37ml
Gamblin : Solvent Free Fluid Oil / Alkyd Painting Medium : 125ml
For watercolour and gouache painters, a lightweight, ready-organised kit removes one layer of decision-making on a day when conditions require your attention. Jackson's plein air watercolour set is a well-considered option at the more serious hobbyist level; the Daler-Rowney gouache introduction set offers a more accessible entry point if you want to experiment with gouache's opaque handling for fog studies without committing to a full range.
Compact kits for watercolour and gouache fog studies
Jackson's : Curated Set : Plein Air Watercolour
Daler-Rowney : Designers' Gouache Paint : Introduction Set
Protecting your materials from moisture matters more in fog than in most conditions. Use a waterproof outer shell for your kit bag, keep unused paper in a sealed dry bag, and carry a microfibre cloth for wiping condensation from surfaces before you start. If you wear glasses, keep a second cloth to hand.
For oil painters working on panels, getting finished work home undamaged requires a sealed wet panel carrier. Fog-day panels take longer to dry than usual in cold damp air, and a carrier that secures panels face-to-face without contact is a worthwhile practical investment.
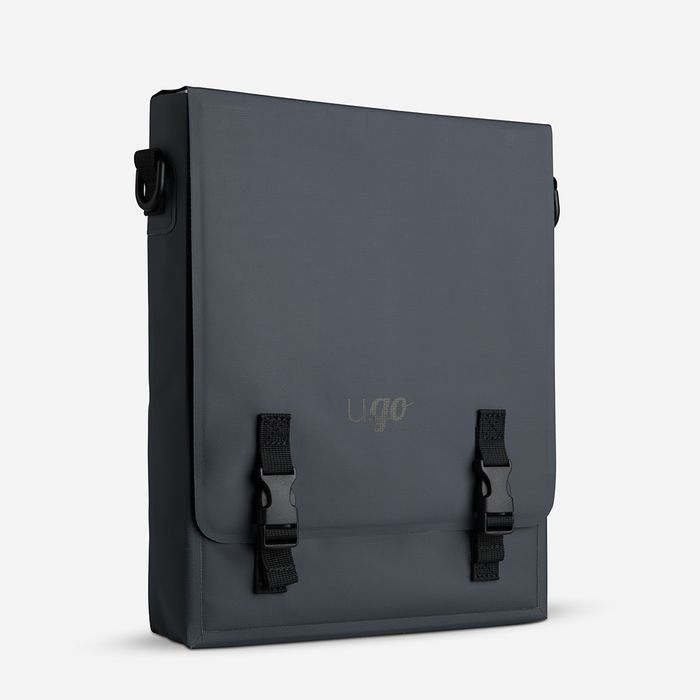
Jackson's
New Wave : U.GO : Plein Air : Wet Panel Carrier : Medium
The Wave U.GO Plein Air Wet Panel Carrier Is A Compact And Portable Carry Case Designed To Ensure Painting Panels Always Remain Secure And Protected From The Elements. Artwork Remains Safe And Protected In All Conditions Due To The Carrier's Construction From Durable, Waterproof,
On clothing: layer for warmth rather than bulk, and include a waterproof outer layer even if it is not actively raining. Fog is saturating. Fingerless gloves let you maintain brush control while keeping your hands from stiffening in cold air. In winter, a headtorch is worth carrying in your bag even if you plan to be back well before dark: UK winter days are short, and fog reduces available light further.
Planning and Safety for UK Fog Locations
Fog is manageable with preparation, but it does introduce genuine hazards that are worth taking seriously before you choose a site.
Check the Met Office forecast before you go, particularly near coasts, moorland, and upland roads. Fog warnings give you a sense of likely duration and density. Note that localised fog can persist hours after a general clearance: an estuary or valley floor may stay foggy well into the afternoon even when surrounding areas are clear.
Avoid painting near cliff edges or coastal paths where the ground edge is not clearly visible. In fog, the visual cues you would normally use to judge proximity to a drop are simply absent. The same applies to tidal areas: if you normally paint on foreshore or estuary mud, be certain you know the tide times before you go out, and err significantly on the side of caution. Fog makes return journeys across tidal ground disorienting.
Near roads and cycle paths, wear a high-visibility vest or jacket. In fog, your typical informal position at the verge of a rural lane becomes a genuine hazard. This applies to any location where vehicle or cycle traffic is possible, including National Park roads and bridleways.
Let someone know where you are going and when you expect to be back. Keep your phone charged. Mobile reception in upland fog can be patchy, so do not rely on a call getting through if you need help: a straightforward message left with someone at home before you set off is good habit regardless of conditions.
Have a plan B
Long vistas can vanish entirely if the fog thickens. Before you set up, identify a closer subject — a tree line, harbour wall, or building — that stays visible even if the distance disappears. This is especially worth doing on coastal or moorland sites where visibility can drop quickly.
Respect access rules. In National Parks and on National Trust land, stay on marked paths and do not set up an easel in a position that blocks or diverts foot traffic. On private farmland, ensure you have permission before entering. Fog does not change the legal position on access, and a polite approach to landowners goes a long way.
What to Do With Your Fog Studies Back in the Studio
Not every fog session yields a resolved painting, and that is exactly as it should be. Conditions shift faster than on a clear day, the light can disappear entirely in minutes, and the narrow tonal range can be genuinely difficult to calibrate outdoors when your eyes are still adjusting. A strong value sketch and a partially blocked-in study are a good day's work.
What you will have from a well-observed session is something harder to invent at home: the actual colour of that particular fog, the precise weight of it, the way the near-ground shapes related to the dissolving distance. Painters from Monet onwards have used outdoor atmospheric studies as working references for larger, more resolved studio paintings, and that is a legitimate and productive way to work.
When you use fog studies as studio reference, resist the temptation to add drama that was not there. The quality that makes fog paintings worth making is their restraint: the compressed values, the quiet edges, the unified atmosphere. Adding contrast to "improve" a fog study tends to destroy what made it interesting. Trust what you observed, and carry it through.
FAQ
Frequently Asked Questions
How do I mix a convincing fog grey for plein air painting in fog?
Start with a cool mid-value neutral, for example a blue-grey base. Add a small touch of the local colour, such as green for moorland or violet for urban dusk, and test the value against the scene. Use this fog grey in every mix for middle and distant elements.
What tonal range should I use in fog?
Use a compressed tonal range. Avoid full blacks and whites. Keep the darkest value reserved for a near-foreground accent and keep mid and far distances within a narrow band of soft mid-tones.
How should I handle edges in foggy conditions?
Default to soft, lost edges for most shapes. Reserve one or two slightly firmer edges for a focal point only. In oils blend wet-in-wet or drag a soft brush; in watercolour work into a damp surface for natural lost edges.
What subjects and viewpoints work best in fog?
Choose simple scenes with a clear foreground anchor, such as a gate, harbour wall or tree. Avoid views where fog has removed all spatial layers. Identify a closer subject as a plan B if the distance vanishes.
What gear and safety steps are important for painting in fog?
Pack a compact protected kit, pre-tone panels mid-value, use a wet panel carrier for oils, and keep materials dry. Check forecasts, avoid cliff edges and tidal danger, wear high-visibility near roads, tell someone where you will be and carry a charged phone.
Author

PleinAirPainting Editorial Team
PleinAirPainting.co.uk helps artists paint outdoors with confidence through UK-focused guides, equipment advice, resources and plein air inspiration.